Posts

Showing posts from August, 2007

Gea's "Sock it to Me Rock" Room Reivew

Image
Gea's Room: "Sock it to Me Rock" Room Review A huge thank you to Gea for sharing her space with us this time in the "SOCK IT TO ME ROCK" room review challenge. I love doing these reviews and hope you all enjoy reading them. My hope is that you can learn a few tips from them. I so appreciate the gals who offer their photos for review. I know sometimes they have to be patient while I work the reviews into my schedule-- but we hope it will be worth the wait!! :) Please feel free to use any hints you see here in your own work areas if they will help you! Thanks to Gea for this room to review! She has a wonderful open, clean space and my points will mainly have to do with where she is keeping her items in the drawers and cabinets. We want Gea to be able to work effectively and efficiently in her deskspaces. To do that she needs to keep her essential items handy-- but not necessarily out in the open. Left side of black desk: Looking at the desk pic above, I see a lot

So happy for them.....

Image
Hurray for us! Here is my baby boy (almost 22) and he is .....ENGAGED!! :) photos by me. :) My son asked his sweetheart to marry him this last tuesday afternoon. We are sooooo very happy for them. Here are a few recent pics of them and of her with her ring. photo by Brittany Bly Wedding planned for Summer 2008. Yeah us! Happy happy happy..... :) Can you tell we love her and have for over 5 years? Rockester

Scrapping 4 Inclusion

Image
Thank you Laurie Weishar for sending us this info: Scrapping 4 Inclusion: The mission of Scrapping 4 Inclusion is to combine one of the fastest growing hobbies in North America with the need for creating awareness and raising funds on behalf of children with disabilities and their advocates. Scrapping 4 Inclusion is a nationwide fundraising and awareness program benefiting The Bubel/Aiken Foundation. I am establishing a large (or soon to be large) network of volunteers who are planning a Fundraising Crop to benefit the Foundation. Currently we have 55 locations across the US planning events. We also have a subscription partnership with Memory Makers Magazine. Ali Edwards has mentioned our program in her blog as she has a son with Autism and she can appreciate what the Foundation we are supporting is all about. Our goal is to spread the word about our program and let all the scrapbookers out there know how they can get involved. Involvement can be planning an even in your own community,

How to organize Rub On lettering tablets

Image
I love, love, love rub on lettering. Let's just say it is one form of lettering I can master and usually looks great. In minutes, I can lay down a word wherever I want to on whatever surface I want to. I love that. I scrap F>A>S>T!! So rub ons are very useful tools for me. It didn't take me long to gain a collection of rub ons in the dozens of styles available. But the question was how to store them so that I could also quickly find the letters and styles and colors I want? I mainly travel to crops with my Making Memories rub on lettering stack tablets. I had maybe 14 of them total and I used them weekly. Soon I had used up so many letters that all 14 packets were a mess. I never knew where I'd find an A, or a T, or a K when I needed it. Did I still have some "P's" left in this packet or in that packet? I started by necessity to blend and mix up fonts for my title lettering. All the words then started to have a typography kind of style. My words had

Making an Acrylic Stamp Storage Binder

Image
I love my acrylic stamps!! I have about 20 sheets of Acrylic stamps now. I love them and wanted them to be together and mobile. I usually scrap away from home at least twice a week. I want storage that is truly innexpensive, is easy to view my stamps, will not 'dump out' in transit, and is compactly portable. Here is what I came up with... I made it from a secondhand store zippered day planner binder, extra 12x12 chippboard cardboards, and some extra 8.5x11 page protectors. Supplies: zippered day planner binder that is larger dimensions than your scrylic stamp sheets. staples and stapler page protectors 8.5x11 hand held hole punch cardboard pieces (I used 12x12 and 8.5x11 cut them down.) my acrylic stamps, block, ink pad to store in binder optional- reuse the dividers from the day planner to label stamp catagories. My binder as it looked when I got it secondhand. 1. Cut cardboard pieces slightly larger than the acrylic stamp sheets that you want to store. 2. Measure your stamp

Milk Jug Frosted Accents

Image
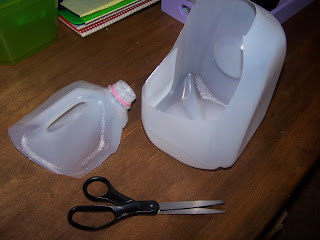
I was experimenting with the concept of using water and milk jug plastic in my punches and dies to make card and page accents. Here is what I did. 1. Cut a clean milk jug apart near the handle lines 2. Assemble your ink, punches and dies. 3. Ink a small piece of the plastic if you like. Otherwise you can leave it with a plain 'frosted' look. Here I used a bumpy looking part of the plastic, but you can work with a smooth area also. Both cut the same. 4. Blot off any excess ink with a tissue to keep your hands clean. You will still get a gently colored look. 5. Use punches or dies on the plastic piece. Red and green Sizzix dies and the Jumbo Thumb-style punches work the best in my experience. 6. You can also freehand cut some swirls from the larger sections of the jug. This was a fun idea and I especially liked the tabs I made. I plan to use these on a page soon and to make some wording from my leftovers. When I get all that done I will add a pic of the finished layout here! :)

Speedy Baby Albums: sample pics of LOs

Image
Don't you love babies? Here are a few sample pics of my speedy baby albums done this summer. Amidst all the chaos of the rest of our spring and summer we wanted to handmake gifts for two very special new arrivals. Luckily both were girls and we kept the color scheme pink. One sweetie is my grand neice and the other is the daughter of a friend. My dd and I did these speedy blank albums in record time --about two days. We did 40 pages total over two 12x12 albums for two young moms. Every page had a matching facing page-- even though they are not all shown here. Simple yes. Rip and Flip I say!! Twenty pages in a day--not bad. Using stash, even better! A gift of love? That's the best part of all. I made a resolution to use all the baby accents we had left in my stash and to use as many pink papers as I could from my stash. If I had two matching pink papers, those were the backgrounds. I then chose the same hue of pink for a second pattern paper or cardstock. Simple, cute blank p