Milk Jug Frosted Accents
I was experimenting with the concept of using water and milk jug plastic in my punches and dies to make card and page accents. Here is what I did.
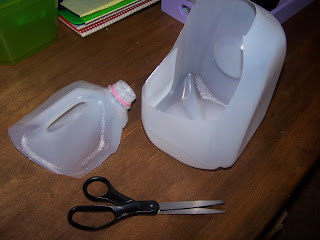
1. Cut a clean milk jug apart near the handle lines
 2. Assemble your ink, punches and dies.
 3. Ink a small piece of the plastic if you like. Otherwise you can leave it with a plain 'frosted' look. Here I used a bumpy looking part of the plastic, but you can work with a smooth area also. Both cut the same.
 4. Blot off any excess ink with a tissue to keep your hands clean. You will still get a gently colored look.

5. Use punches or dies on the plastic piece. Red and green Sizzix dies and the Jumbo Thumb-style punches work the best in my experience.
 6. You can also freehand cut some swirls from the larger sections of the jug.
 This was a fun idea and I especially liked the tabs I made. I plan to use these on a page soon and to make some wording from my leftovers. When I get all that done I will add a pic of the finished layout here! :)
1. Cut a clean milk jug apart near the handle lines
 2. Assemble your ink, punches and dies.
 3. Ink a small piece of the plastic if you like. Otherwise you can leave it with a plain 'frosted' look. Here I used a bumpy looking part of the plastic, but you can work with a smooth area also. Both cut the same.
 4. Blot off any excess ink with a tissue to keep your hands clean. You will still get a gently colored look.
5. Use punches or dies on the plastic piece. Red and green Sizzix dies and the Jumbo Thumb-style punches work the best in my experience.
 6. You can also freehand cut some swirls from the larger sections of the jug.
 This was a fun idea and I especially liked the tabs I made. I plan to use these on a page soon and to make some wording from my leftovers. When I get all that done I will add a pic of the finished layout here! :)


Comments