Remaking a French Photo Memo Board
This is a smaller project that came up while changing out my daughter's room this week into a guest room and mini workspace for me.
This is how I restyled a french photo board...using doilies and brooches!
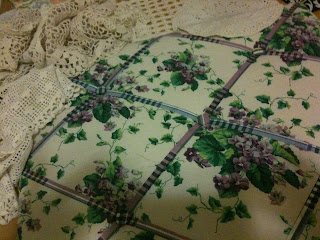
Her existing french memo/photo board was a little "too purple" for my taste. Now that this room is changing focus, I wanted to change the board's color scheme. But how to tone it down using only what I have on hand in my home? Something white or cream would be optimal, something older, something plentiful... ahhh yes, doilies. My mom just sent me a box 2 weeks ago from her stash of my great-grandmothers linens. Perfect! Let's put our special lovelies to work!

I layered two large doily circles and 3 smaller odd shapes on top just to see how it looked. I liked it. Proceed to the attaching... hmmm not thumbtacks (too officey), not sewing (too tedious), Not all straight pins (looks tacky) .....thinking ...thinking....

AH HA! Vintage brooches from my old brooch tin.

Yep. That works and looks vintage too. Rather proud of myself that I thought this up as a solution. LOL Starting in the center the brooches anchored here and there --through the doilies --to the back padding. I did not close the brooches, I just pushed them in place like straight pins.


I pinned the excess doily circle edges that hung over the sides on to the back of the memo board with normal straight pins. Then I changed out the purple ribbon for a green satin one to hang it. Add photos of our family members by tucking the photos in under the brooches and adding some straight pins to secure. Vintage hat pins would also work. Poof I am done. Took about an hour total. Again, using only items that I had on hand too.

Love it! :)
TIP: If you determine that the photo board is heavier on one side than another, just rearrange the larger brooches (some are heavier than others) or 'weight' one side like I did with the vintage scissors (also from great-grandma) on a twine loop. Adding small vintage items to even out the balance is a simple fix and it looks adorable too.
Enjoy!
This is how I restyled a french photo board...using doilies and brooches!
Her existing french memo/photo board was a little "too purple" for my taste. Now that this room is changing focus, I wanted to change the board's color scheme. But how to tone it down using only what I have on hand in my home? Something white or cream would be optimal, something older, something plentiful... ahhh yes, doilies. My mom just sent me a box 2 weeks ago from her stash of my great-grandmothers linens. Perfect! Let's put our special lovelies to work!

I layered two large doily circles and 3 smaller odd shapes on top just to see how it looked. I liked it. Proceed to the attaching... hmmm not thumbtacks (too officey), not sewing (too tedious), Not all straight pins (looks tacky) .....thinking ...thinking....

AH HA! Vintage brooches from my old brooch tin.

Yep. That works and looks vintage too. Rather proud of myself that I thought this up as a solution. LOL Starting in the center the brooches anchored here and there --through the doilies --to the back padding. I did not close the brooches, I just pushed them in place like straight pins.


I pinned the excess doily circle edges that hung over the sides on to the back of the memo board with normal straight pins. Then I changed out the purple ribbon for a green satin one to hang it. Add photos of our family members by tucking the photos in under the brooches and adding some straight pins to secure. Vintage hat pins would also work. Poof I am done. Took about an hour total. Again, using only items that I had on hand too.

Love it! :)
TIP: If you determine that the photo board is heavier on one side than another, just rearrange the larger brooches (some are heavier than others) or 'weight' one side like I did with the vintage scissors (also from great-grandma) on a twine loop. Adding small vintage items to even out the balance is a simple fix and it looks adorable too.
Enjoy!


Comments