Posts

Showing posts from October, 2011

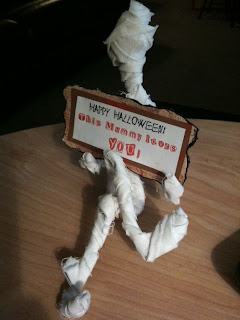
Mummy loves you!

Image
Corny I know. But I had to make them. I was inspired by this link I found through PINTEREST with instructions http://cfabbridesigns.com/blog/halloween/mini-mummies/ I made one for my son and one for my daughter. SHhhhhh! Don't tell. It's a secret. My kiddos are both married and live in different states....I just had to send them each goodie boxes. They are getting these adorable mummies in the mail this weekend. I used wire for the inner armature that my hubby had in the garage. That and a white cotton muslin rag that I tore in continuous strips. These mummy buddies literally take about 20 minutes each. Done is good. Nice thing is they BEND so you can pose them. Print out your choice of wording by computer in Fall colors for the sign and mat a couple times with Fall papers. Your mummy really will gain a personality of its own when you start to shape them. Very cute. Have fun with it!

Boo! It's a Happy Halloween Banner!

Image
Time for a brand new post about a brand new project! Time for a little SPoOkY fun! Look what I started with. I just brought ALL my remaining Halloween items in to play. I started with several papers in brown tones, oranges and a bit of Tim Holtz thrown in along with a bit of graph paper. No skeletons, No zombies. I had about 2 1/2 feet of flocked white spider web ribbon, orange acrylic paint, chalk inks, brads, ribbons, fancy buttons, a couple plastic spider rings, some Funk and Wagnalls dictionary word pages and an extra Happy Halloween ATC card I made this month for a swap. I am not a big fan of Halloween which is why this banner is only 3 pennants wide (Boo) instead of 6 (Spooky) or 14 (Happy Halloween). I wanted to make a happy party banner with a positive twist. I did not buy a single thing. You know me, I say let's use what we have! :D My Fall and Halloween stash is now officially super LOW. And that's a fabulous thing! Now, look what I created! A sweet shabby-chic...