
Gift Wrap for Pennies.
It's going to be a handmade shabby chic Christmas!
I have been working today on our Christmas wrap and getting my gifts in order. Oh hush, it's NOT too early! LOL I shop and create all year long so I end up with baskets full of gifts at this time of year just waiting to be wrapped and tagged and tucked away until December. I need to clear the tables and get these off my docket so I can move on and get the next batch ready for Dec 2011.
That means it's also time for GIFT WRAP! I saw some great concepts on Pinterest lately and I was inspired! My workplace tosses out literally garbage bags full of plain brown rumpled craft paper every week. We get it in packed product shipments but the store has no use for it---until I came along! I am adopting the brown paper to make my gift wrap for 2011! I challenged myself--like I do so often-- to make it COMPLETELY from stash if possible. It was important to me to stay "green" with this project and use up some of my already existing white accents, paints, trims, and so on with this donated 'trashed' craft paper. Craft paper brown and white look terrific together. Shabby chic all the way!
Now that I had the wrap concept, I had to plan my tags and ribbons to somehow coordinate. What did I have a LOT of that I could make tags from? In my studio I found a 1/2 inch stack of white 12x12 chipboard and several sheets of leftover 12x12 brown and cream font handwriting paper. The chipboard was the kind you get on the backs of paper stacks. DING! DING! DING! And away we go!
I grabbed my white and brown inks and paints and a few snowflake rubber stamps. My arms were full but I tucked my Tattered Angels mist bottle on top! On the way out of the room I snagged a yard and a half of prewrinkled rippled white cotton fabric to tear up for my "ribbon". Whew!
TIP: Garage sales are the best sources for unique fabrics!

As you can see, I work in assembly line style. I cut LOTS of 3x5 tags! Tag steps from left to right: Cut the tags. Mist the tags. Chalk ink the edges. Add the pattern paper at the bottom. Stamp the snowflakes. Add TO and FROM with brown Zig marker. Stamp the back with a complementing stamp. Lastly I added a little sparkle with glitter glaze and gems on the snowflakes.
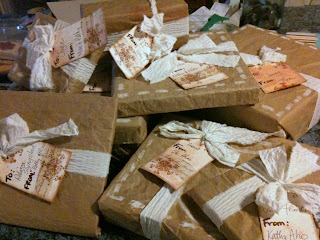
I tied up my gift with a 1 x 45 inch strip of my torn white fabric and here is the finished item! I might add some more lace or bling to the bow areas too. I have a whole little tin of rhinestone bits that might look good on the bows of the ladies gifts.

I think a holiday tree with oodles of these underneath it will look so sweet. :D

I have been working today on our Christmas wrap and getting my gifts in order. Oh hush, it's NOT too early! LOL I shop and create all year long so I end up with baskets full of gifts at this time of year just waiting to be wrapped and tagged and tucked away until December. I need to clear the tables and get these off my docket so I can move on and get the next batch ready for Dec 2011.
That means it's also time for GIFT WRAP! I saw some great concepts on Pinterest lately and I was inspired! My workplace tosses out literally garbage bags full of plain brown rumpled craft paper every week. We get it in packed product shipments but the store has no use for it---until I came along! I am adopting the brown paper to make my gift wrap for 2011! I challenged myself--like I do so often-- to make it COMPLETELY from stash if possible. It was important to me to stay "green" with this project and use up some of my already existing white accents, paints, trims, and so on with this donated 'trashed' craft paper. Craft paper brown and white look terrific together. Shabby chic all the way!
Now that I had the wrap concept, I had to plan my tags and ribbons to somehow coordinate. What did I have a LOT of that I could make tags from? In my studio I found a 1/2 inch stack of white 12x12 chipboard and several sheets of leftover 12x12 brown and cream font handwriting paper. The chipboard was the kind you get on the backs of paper stacks. DING! DING! DING! And away we go!
I grabbed my white and brown inks and paints and a few snowflake rubber stamps. My arms were full but I tucked my Tattered Angels mist bottle on top! On the way out of the room I snagged a yard and a half of prewrinkled rippled white cotton fabric to tear up for my "ribbon". Whew!
TIP: Garage sales are the best sources for unique fabrics!

As you can see, I work in assembly line style. I cut LOTS of 3x5 tags! Tag steps from left to right: Cut the tags. Mist the tags. Chalk ink the edges. Add the pattern paper at the bottom. Stamp the snowflakes. Add TO and FROM with brown Zig marker. Stamp the back with a complementing stamp. Lastly I added a little sparkle with glitter glaze and gems on the snowflakes.
I tied up my gift with a 1 x 45 inch strip of my torn white fabric and here is the finished item! I might add some more lace or bling to the bow areas too. I have a whole little tin of rhinestone bits that might look good on the bows of the ladies gifts.

I think a holiday tree with oodles of these underneath it will look so sweet. :D


Comments
Thanks for your sweet support and words on my Little Yellow Bicycle announcement! I am just giddy, I got the news just after checking in for surgery last Friday. : )
All is going well, but I'm not running any marathons yet. Hoping to scrap today, cross your fingers for me!!!
Sue.