Posts

Wedding Album: Making Page Kits

Image
Start making some Wedding Album page kits! Use your 12 x 12 three-ring album to actually hold the page kits that you are organizing for this album in chronological wedding order. Here is how I did it. Print out that list I gave you previously of all 30 wedding layout topics. Print them onto a sheet or two of paper. Cut them up into individual slips that you can tuck one by one into the empty page protectors in chrono order. Tuck the strips into the protectors now. Truthfully, I START making a page kit with my accents . I afterward pick my papers that match the accent. This is in reverse order of how many people do things. I choose my accents first because they are more spendy --and much more color-specific to match to than my (cheaper) thousand sheets of paper in hundreds of shades of color. For any page kit, start with your accents, add fiber or ribbon if you like, then add matching papers, feel free to make the kits, and finally add photos when printed. A single title pa...
Wedding Album: Sketches Please!

Image
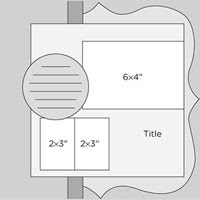
I love page maps and layout sketches and any kind of helpful page plan. For a big project like a wedding album, I want to save myself time at each stage that I can. For this kind of large album (60 planned pages!) I grab my Becky Higgins Sketches book as well as my Becky Fleck Page Maps book. Then I head to the internet and print out about a dozen sheets of page sketches my favorite sites. I keep them all togehter with the layout sketch books mentioned above just so I can grab them and decide at a moments notice what to creat as a backdrop. I should mention here again that I have NO photos really yet for this project. For that reason I should say I am really planning and making BACKGROUND pages so far. Not fully done pages--yet. I will make everything in my sketch plan and glue it all down from paper layers to accent pieces--EXCEPT for the final focal mats (white mats in this project) and photos. It's just like assembling a whole page kit from a scrapbook or convention class...

Wedding Album: Planning the Layout Sets

Image
Planning: Page Sets: I work with a plan. That means I want to have the timeline of the wedding in my head when I plan my pages and make my kits. We have not taken photos yet but I have a rough idea of how the wedding will go in chronological fashion. I write down all my main page layout topics on a sheet of scratch paper from engagement day to honeymoon departure. Here is my listing of two page layouts that I plan to do for the wedding albums. Looks like 30 or so page topic sets. Feel free to use this list (add or delete topics as needed) when planning your own wedding album! If I do 30 two-page sets it will be a 60 page album which is another reason I choose Binder style 3 ring albums from Making Memories. :) --- Engagement Day Engagement –formal photo shoot The Rings- Dress shopping -candids Bridal shower Batchelor party Batchelorette Party Rehearsal at venue Rehearsal Dinner and Groom's Cake The Dress- professional shots Girls getting ready Bridesmaids group Groomsman group Flo...

Planning a Wedding Album :)

Image
Wedding Albums! Let's talk! We are so excited our daughter got engaged this spring (on May Day!) We couldn't be more happy with her choice. He is a great guy. Hurray!!! Love it. So now the fun begins for a scrapping mom! ....Wedding albums! One of my favorite things to create! We are going to need three of them: one for my hubby and I, one for my daughter and her (next year) hubby, and one for his parents. So I am off and planning a fantastic wedding album-- in triplicate! YES TRIPLICATE! I did my son's four years ago in duplicate--one for him and his lovely bride and one for my hubby and I to keep. But this time I am going triplicate so the in-laws have one if they want it too. Goals: Goal #1 Create a beautiful, memorable, and personal gift Goal # 2 Use what I have in my stockpiles Goal # 3 Knock their socks off design wise without breaking my bank. After all we do have to pay for the REST of the event, right? ;) Supplies: Paper: Its a woodland theme with earth-...

Winter 2010 layout

Image
Just started--and finished--this one today. I love how the metallic elements (mini silver brads and snowflake brads) added so much to this winter layout. I have to print the following photos of my daughter and her sweetie at the Great Waters Brewery this winter in St Paul MN. But I will add those pics to it tomorrow. Isn't that ice block sculptured furniture amazing??? And the two lovebirds are pretty sweet too. ;) Moving onward in my goal to get even more accomplished in 2010~ Enjoy!

WINNER!

WINNER!! The lucky winner of 4 handmade cards FREE is this post: " Beth Johnston said... Love your cards - thanks for sharing - bjohnston@ewol.com " Thank you all for posting! And yes girls --Australia and the Netherlands are eligible--no problem. Be sure to watch the blog for future contests! I will be sending Beth an email this morning to get her postal address. I plan to ship out her assorted 4 cards with envelopes this week! Thanks to all who commented! I hope the posts inspire you all to try making some cards from scraps and from stash! We will have another blog giveaway soon!

TUTORIAL: Handmade Mini Paper/Chipboard Bushel Basket

Image
BASIC GREY MINI BUSHEL BASKET Look what you can make with one 12x12 sheet of your favorite paper and one piece of 12x12 chipboard! (I used a couple half sheets of Basic Grey since I love that mixed papers look.) Add a little Mod Podge and about a dozen cute brads! This little bushel basket style makes up into a roughly 4x4x4 sized little beauty. It is perfect for holding a small gift --or a bag of snack candy bars for your co-workers on an office desk. Cut 12 strips of chipboard and twelve strips of pattern paper. You can mix and match pattern papers this way. Of if you want the total basket to be uniform of one paper, then you can spray adhesive onto one piece of 12x12 paper and attach it to one piece of 12x12 chipboard. Cut the whole thing into 12 one inch strips. After your glue is dry, ink the edges of all. Above: Center each one inch strip with a small hole at 6 inches for your center post. Above: Add a mini album post and screw (or a very strong long-legged brad) at center and f...